1.3 How to Navigate
You have now learned the basics of position, distance, speed and direction. All the processes of navigation use these basics, and the next stage is to look at and understand these processes.
This section contains some more ADVANCED CONTENT than you need for a practical Day Skipper course. Most people will be happy to study it anyway, but in case you get stuck and worry about it, or haven't got time for it, you can stop reading if the paragraph is coloured like this one.
As a navigator, your problem is to find your way from one position to another position, and to know where you are along the way so that you can avoid any dangers along the route. Let us consider the basic problem of getting from A to B.
Tools of the Trade
The following sections talk about working on a chart, so it is appropriate to mention the tools you need when you are doing this.
Apart from the obvious pencil (soft, for rubbing out) you need:
• dividers, for measuring distance on the chart
• a Breton Plotter or similar device for measuring direction, and for drawing lines in a particular direction.
Use of these tools is a practical skill, and describing their use in detail is somewhat outside the scope of this book. But they are probably the only tools you need for the techniques that are explained next.
(One other possibility is compasses for drawing arcs of circles, but you can usually use the edge of a plotter instead. Parallel rules will make you look like a real navigator, but are not particularly useful, or practical on a moving boat.)
Dead Reckoning
A chart marks the positions of the places you want to go from and to. You can also plot the boat’s position on the chart. So the simplest way to find your way from A to B (assuming there are no dangers in between) is:
• mark the positions of A and B on the chart, or find them if they're already marked
• draw a line from A to B
• measure the direction of this line (Breton Plotter)
• apply the corrections to get compass direction (variation and deviation - see previous section)
• steer in that direction using the ship’s magnetic compass.
The chart will also give you the distance from A to B. Measure this using a pair of dividers, and read off the side of the chart in nautical miles.
The ship’s log will tell you the distance in nautical miles that you have travelled through the water. Take a note of the log reading when you are at A, or set it to zero: and the log reading will then tell you how far you have travelled from A towards B - assuming for the moment that the water is not moving relative to the ground (i.e. no tidal streams or currents).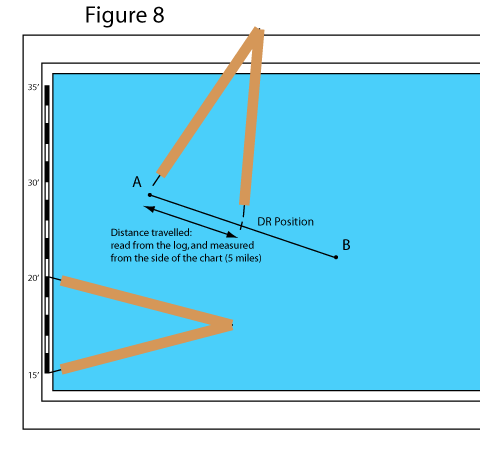
If you measure off the logged distance on the side of the chart (dividers again) you can mark your position on the line from A to B.
This is called Dead Reckoning (DR). You are finding your way and plotting your position purely by travelling in a straight line and measuring how far you have moved through the water.
Figure 8 illustrates this process.
Estimated Position
Dead reckoning is the simplest way to estimate the boat’s position, but there are two factors that can produce errors in the DR position:
• the first is that the boat may not be moving straight through the water in the direction you are steering in, and it is pointing in
• the second is that the water itself may be moving.
Both of these errors can be allowed for, and making these allowances gives the best Estimated Position or EP.
Leeway
The first of these is called leeway. It applies principally to yachts sailing close to the wind, but can also apply to a shallow displacement powered craft in a strong cross wind. Essentially, the boat may be moving through the water in a slightly different direction to that which it is pointing in.
We need a couple of new terms to explain this: the ship’s heading or course steered is the direction the ship is pointing in (as read from the ship’s steering compass), whereas the water track is the direction in which the ship is moving through the water.
The leeway is the difference between these, and it varies from boat to boat and under different conditions of wind and sea state. 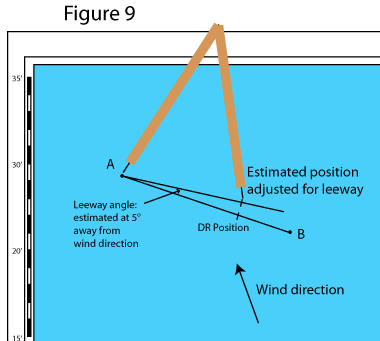
Logically in a yacht the water track will be further off the wind than the ship’s heading, (unless you have an angled keel, which could give zero, or even negative, leeway).
So the first thing you can do to improve on your DR estimate is to plot the water track rather than the course steered, and measure distance travelled against that. Figure 9 illustrates this.
Tidal Stream
The second correction is due to the fact that the water itself can be moving over the ground.
This idea can be very surprising to those who do not know the sea well, because when you are floating on the water you have no sense of it happening. It is only when you see the water moving against something anchored to the bottom, like a buoy or lobster pot marker, that you realise the water is flowing like a river. I know one skipper who has told innocent and gullible crew that a buoy moving through the water was being towed by a submarine, and that is exactly what it looks like (see figure 10).
Much the most common cause of water motion in the seas around Europe is tidal stream. The motion of the water due to tidal streams can be measured and predicted. Chapter 2 explains tidal streams and how you can predicted them from tidal data. For ocean sailing you may need to take into account currents, which are reasonably predictable and are not tidal, but these can generally be ignored for coastal sailing around British waters.
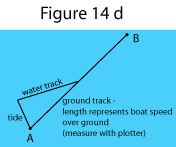
Another term is introduced to help with this: ground track is the actual path of the boat relative to the ground, just as water track was the path through the water. The difference between the two is the movement of the water itself.
Allowing that the speed and direction of water movement can be calculated, this can be added to the movement of the boat through the water.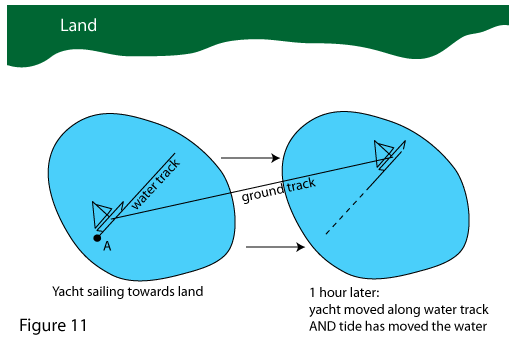
Mathematicians will recognise this as the addition of two vectors, but it is simple common sense: in a certain period of time you move a distance through the water, but in addition to that the water moves (i.e. you would have moved with it even if you had been stationary in the water). It is the same as walking on a moving walkway or escalator. Add the two together and you have the boat’s total movement as illustrated in Figure 11.
Plotting the EP
So to plot the boat’s EP you follow a slightly more involved process than the DR:
• estimate the leeway (say, 5° if you are sailing close to the wind - or zero if you are motoring, or sailing down-wind)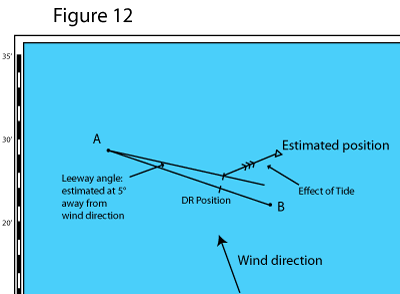
• draw the line from A in the direction of the water track, i.e. the course steered but adjusted for leeway
• read the logged distance, and mark that distance on the water track line from A
• from that point draw a line in the direction the tidal stream is running
• mark on that line the distance the tidal stream has run in the time since you left A, and this is your EP. Figure 12 illustrates this.
Course to Steer
From the diagram, you can see that we have estimated our position all right, but the trouble is, we're not going towards B! Ideally, we would like to adjust the direction that we're steering in, so that we DO get to B.
There are two ways that this can be approached. It is quite possible to work out the course to steer in order to get to B, provided we have good estimates of:
• leeway
• tidal stream - speed and direction - for the duration of our passage to B
• our own speed, for the duration of our passage
This also assumes that we CAN steer in the direction we want to, i.e. it isn't too close to the wind.
In practice, however, coastal yachtsmen rarely spend time working this out, because there is an easier option available to us - so I'll explain this first.
Course to Steer - Modern Practical Approach
I can hear traditionalists saying I'm teaching the lazy approach, but it's not lazy as long as you understand the principles behind it. We're going to use the GPS, but we're also going to check that we aren't making any silly mistakes.
First, measure the course from A to B off the chart. Make the adjustments for variation and deviation, and that's your first estimate of the course to steer.
Then, work out which way you think the leeway is going to take you (away from the wind) - and also look up which way the tide is taking you (see the chapter on Tides). Normally it will be reasonably clear from this that you are going to be pushed either to the left or to the right of your desired track to B, and you are going to have to steer slightly off your measured course, in order to compensate for this and track towards B.
So steer a little bit off the course you previously measured, so as to counteract tide and leeway, and you can use the GPS to give you the direction that you're actually moving in - your ground track (sometimes COG, or Course Over Ground). This needs to be close to the direction from A to B - and you can adjust the course steered until it is close enough.
Make sure that you are steering off in a direction that makes sense, given what you know about the tide and leeway.
Beyond that, there are a few ways that you can check that you are still on the right track, or which side you've wandered off to. You need to make sure that B stays in the same direction (i.e. the direction you measured on the chart) as you move closer to it. If you can see B, you can check this with a hand bearing compass, and a transit with the land behind it if possible (see the section on position lines). If you can't see B, you could put its position into the GPS as a waypoint and check its bearing that way.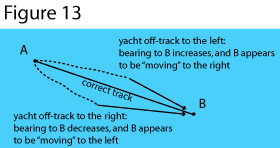
If the bearing towards B is increasing you're going to the left of the track, and vice versa. So if you are wandering off the track, adjust your course again. Figure 13 shows this.
Course to Steer - Theoretical Approach
The theoretical approach relies on estimating tidal speed and direction, and your own speed. It is only valid if these estimates remain valid - so if the wind drops and you slow down, you're going to have to re-calculate.
We described "adding" the movement through the water (speed and direction) the movement of the water itself (speed and direction), to get the "ground track" of the boat. Mathematicians call this vector addition (a vector is something that has both magnitude, in this case speed, and direction). What we now need to do is adjust one of these - the boat's direction - so that the ground track is in the direction we want.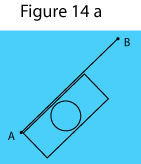
The easiest way to do this is as follows:
• use the Breton Plotter to draw a line from A to B. This is the ground track we want.
• draw the tide vector from A.
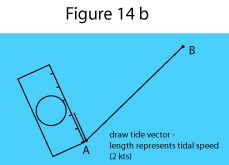 This is a line going in the direction the tide is going in. Its length is a representation of the speed of the tide, and the clever thing is, this can be in any units we want, as long as we stick to them. So choose a convenient scale off the side of the Breton Plotter (where there are several different scales marked) and draw the line, say, 2 units long for a 2 knot tide.
• from the end of this line, we need a second vector to get us back onto the ground track line.
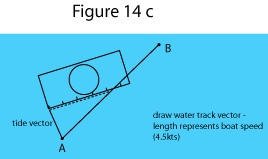
This is our speed and direction through the water. We estimated our speed, so say that was 4.5 knots, draw a line 4.5 units long (same units) which gets exactly from the end of the tide vector back to the AB track. This is very quick if you use the side of the plotter, where the units are marked, and swing the plotter round till a line of the right length just fits.
• the direction of this second line is the direction of the water track we need and (ignoring leeway for the moment) the course we should steer.
• you can get one other piece of information out of this triangle: the length of the third side, along the AB line, in the same units, is the speed in knots at which we will travel towards B.
Measure the direction of the water track vector, apply corrections for variation and deviation, and then allow for leeway - adjust the course by 5 degrees or so into the wind if the wind is forward of the beam (otherwise you can pretty well neglect the effect of leeway).
Other Practical Methods
If you are going across the English Channel, which may be your first "serious" passage, a glance at the tidal atlas will show you that the tide is essentialy running East or West at any given time. The passage is going to take you quite a few hours, and you want to average the effect of the tidal stream over, say, 10 hours. So we take a slightly different approach to working out where we should steer.
Incidentally there is plenty of software available to run on, say, a laptop which will do this kind of planning for you. The software will typically contain a database of tides, and may even interface with a weather forecast! (It makes you wonder why you would bother to be on the yacht at all.)
But if you are a traditionalist or haven't got a laptop, here goes:
• mark on the appropriate page of your tidal atlas roughly where you will be, for each hour of the passage
• take a note of the predicted tidal stream at your expected position for each hour, East or West. It's easiest if you write this down in two columns, one for East and one for West. In this way you are noting how far the tide is predicted to push you in an each hour (knots x 1 hour = nautical miles)
• add up both columns and "net" them - subtract one from the other - and note whether the net total is East or West.
You now know that you are going to be pushed a small number of miles to East or West - so head for a point on the coast which is that number of miles further to the West or East of your destination.
Typically, if your passage time is around 12 hours (say Poole to Cherbourg) the East and West movement will very nearly cancel each other out. Once you have worked this out a few times you probably won't bother and just aim straight for your destination!
By the same token, it's interesting to note that this kind of planning becomes less and less relevant if you are doing longer passages. What you do is ignore the tide until you get reasonably close to your destination - then work out a stragegy so that you end up, if possible, with the tide helping you towards your destination.
